
Swing Traders, mitigation blocks and order blocks are often mentioned together, but they are not the same thing, and treating them as interchangeable usually leads to weaker chart reads and lower-quality entries. Both concepts sit inside price action and liquidity-based trading, yet they describe different moments in how price interacts with supply, demand, and previously important zones.
That difference matters because one concept is usually about the origin of an impulsive move, while the other is more about price returning to rebalance or “mitigate” an existing inefficiency before moving again. If you understand where each one belongs in the story of price, it becomes much easier to judge whether a zone deserves attention or whether you are forcing a label onto a chart that does not really support it.
What is an order block?
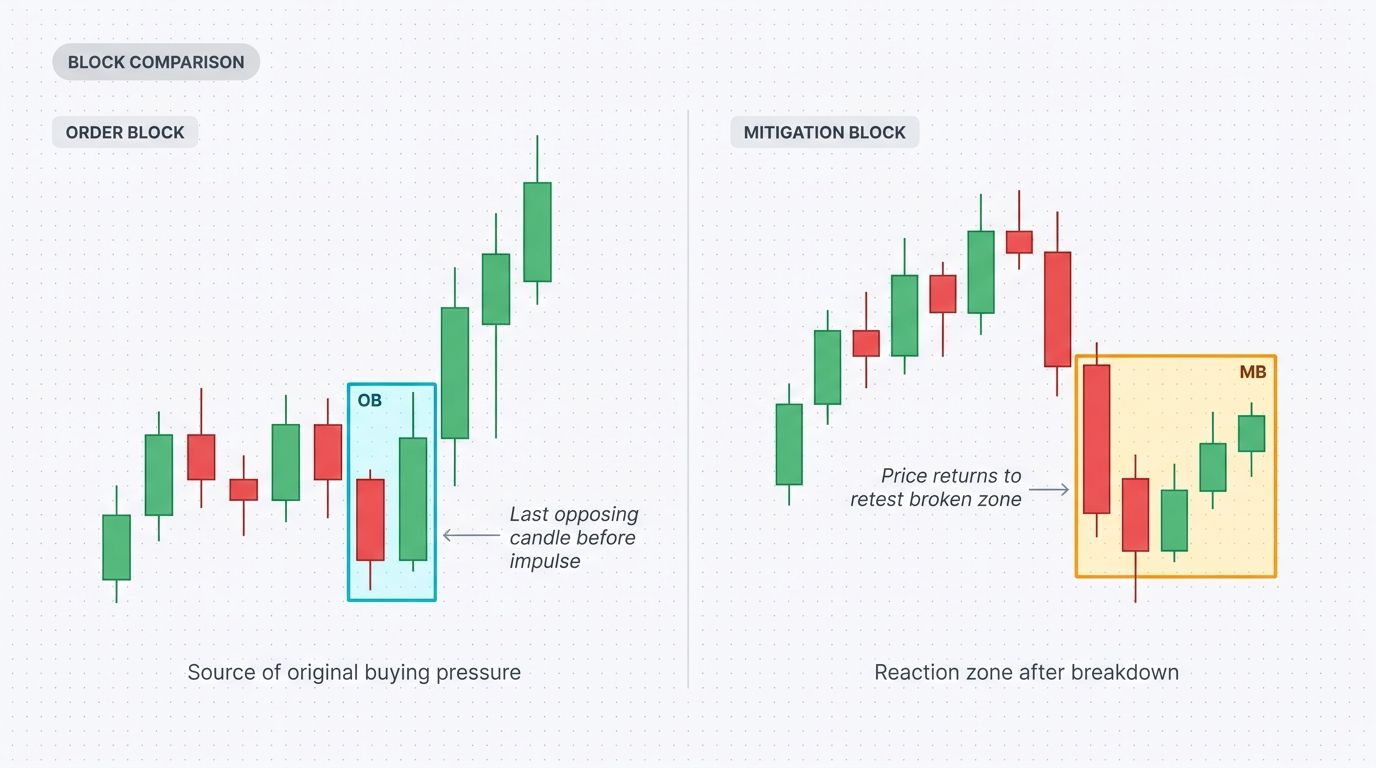
An order block is typically understood as the last opposing candle or small cluster of candles before a strong impulsive move that breaks structure and shows clear displacement. In practical terms, traders mark that zone because they believe it represents an area where significant buying or selling activity was involved before the market expanded aggressively away from it.
A bullish order block is usually associated with the final bearish candle before a strong move upward, while a bearish order block is often tied to the final bullish candle before a strong move downward. The idea is not that the candle itself is magical, but that the area it represents may later act as a meaningful zone if price returns and reacts there again.
What is a mitigation block?
A mitigation block is a zone where price returns to “mitigate” or rebalance a prior area of interest, often after a strong displacement move has already happened. Instead of focusing mainly on the origin of the move, the emphasis is on the return into a zone where unfilled or partially resolved activity may still exist, allowing price to rebalance before continuation or reversal.
This means a mitigation block is usually more connected to the revisit than to the original expansion. Traders pay attention to it because price often comes back into these areas to fill inefficiencies, rebalance order flow, or test whether the zone still holds before the next move develops.
Why traders confuse mitigation blocks and order blocks?
The confusion usually happens because both concepts involve marked zones, both can appear near strong reactions, and both are often discussed in the same liquidity-based trading conversations. If price leaves a zone aggressively and later returns to it, many traders immediately label it one way or the other without clearly asking what role that zone actually played.
The cleaner way to think about it is this: an order block is more often tied to the origin of displacement, while a mitigation block is more often tied to the return into a previously important area that price is revisiting to rebalance. They can overlap on a chart, but they are not defined by the same purpose.
How an order block forms
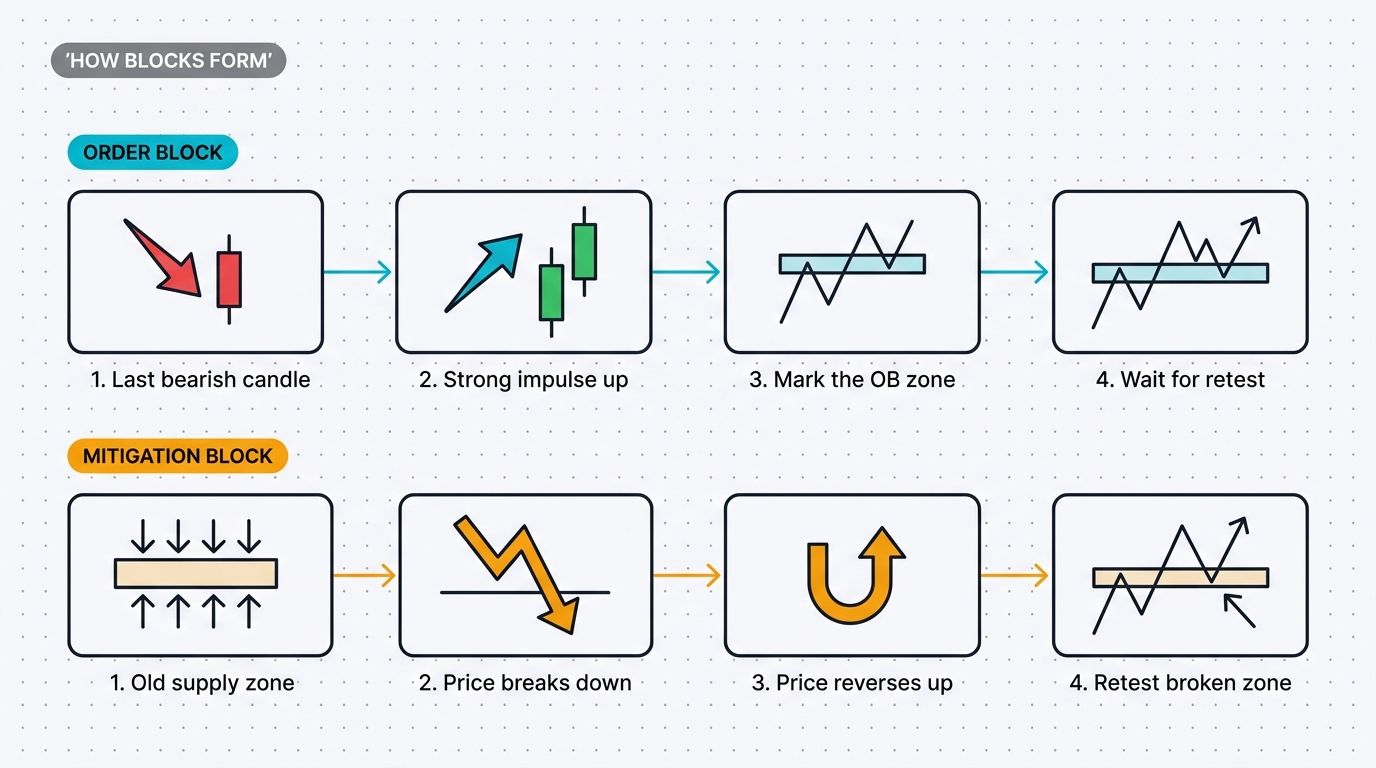
An order block forms when price builds a local structure, then leaves that area with obvious strength and breaks market structure. That displacement is important because it separates a meaningful zone from ordinary candles that price simply traded through without consequence.
A cleaner order block usually has:
• a clear final opposing candle before expansion
• strong displacement away from the zone
• a break of nearby structure after the move
• visible intent, not slow drifting price
Without displacement, the zone loses much of its value. If price leaves slowly, weakly, or without breaking anything meaningful, the “order block” label becomes much less convincing.
How a mitigation block forms
A mitigation block becomes relevant when price returns into an area after displacement, especially when that return helps rebalance a previously inefficient move. In many cases, traders identify it after the market has already shown strong expansion, then watch the pullback into a zone that may now act as a reaction area.
A cleaner mitigation setup usually has:
• a prior impulsive move that left imbalance or inefficiency
• a return into a meaningful zone after that move
• visible reaction or slowing inside the revisit
• a contextual reason for continuation or reversal after the touch
This is why mitigation blocks often feel more “active” in the present moment. The focus is less on where the move started and more on how price behaves when it comes back.
The core difference between mitigation blocks and order blocks
The simplest difference is that an order block is usually defined by where the move started, while a mitigation block is usually defined by where price comes back to rebalance after the move is already underway. That makes order blocks more origin-focused and mitigation blocks more revisit-focused.
In practice, this changes how you read them. When marking an order block, you are asking, “Where was the last meaningful opposing candle before displacement?” When marking a mitigation block, you are asking, “Where is price returning to resolve imbalance or interact with a previously important zone before the next move?” Those are related questions, but they are not the same question.
Mitigation block vs order block in chart behavior
On the chart, an order block often stands out because the move away from it is aggressive and structurally important. You usually recognize it by looking backward from the displacement and identifying the last meaningful opposing candle before the impulse.
A mitigation block becomes more obvious as price returns. Instead of the emphasis being on the initial departure, the emphasis is on the revisit and the way price reacts when it comes back into that area. That return is often where traders look for confirmation, continuation, or evidence that the market is rebalancing before moving again.
This is why order blocks are often easier to spot during post-move analysis, while mitigation blocks often become especially relevant during the pullback phase. The timing of the read is part of what separates them.
Which one matters more for entries
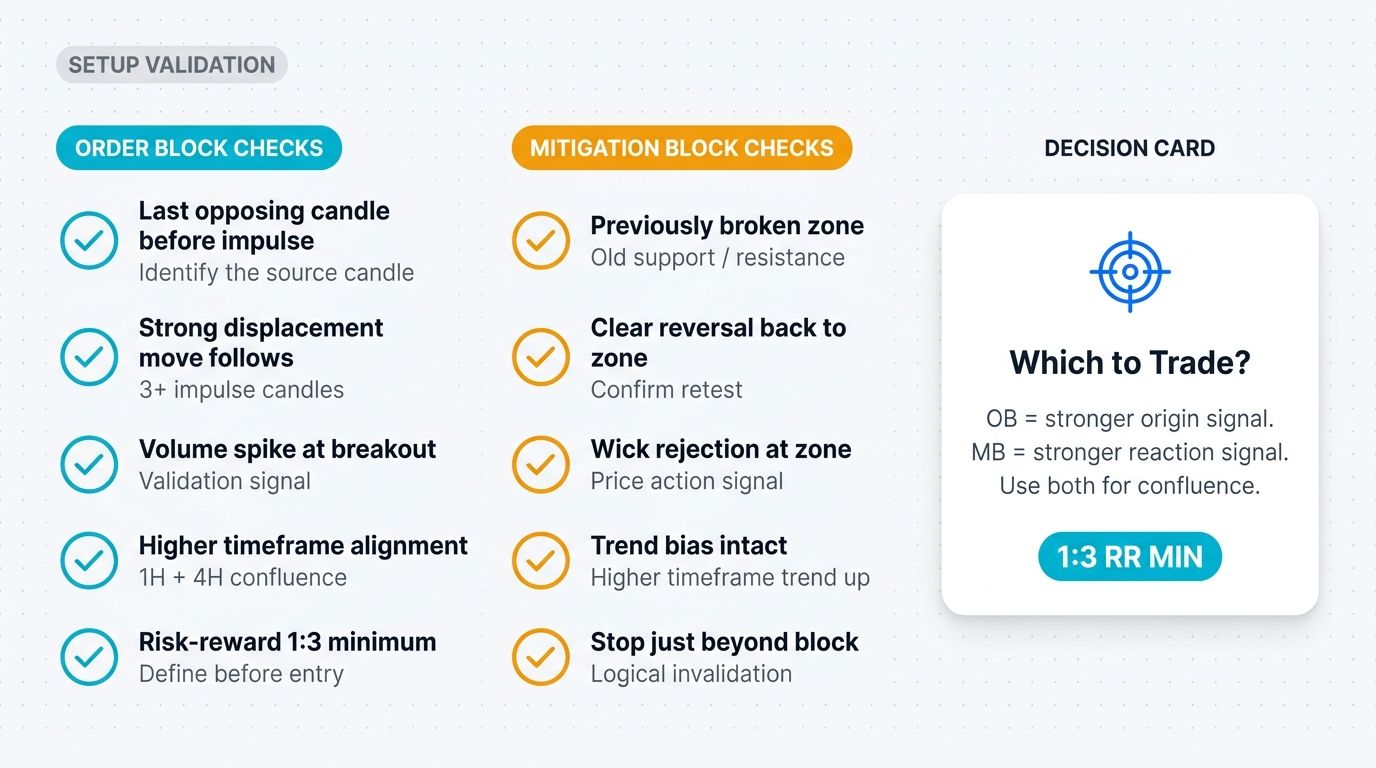
Neither concept is automatically “better” in all cases, because they serve different purposes. Order blocks can help you understand where a strong move originated, while mitigation blocks can help you understand where price may react during a return into structure.
For entries, mitigation blocks often feel more directly actionable because they are tied to the revisit, which is where traders are actually deciding whether to engage. Order blocks, on the other hand, can be extremely useful for framing context, marking important zones, and identifying where meaningful displacement began, even if the actual entry still comes only after the market returns and confirms.
The better question is not which one is superior. The better question is whether the zone is structurally clear, whether the context supports the idea, and whether confirmation appears when price reaches it.
How to use order blocks and mitigation blocks together
The strongest reads often come when you stop treating these ideas as competing labels and instead use them as layers of context. An order block can help explain the origin of the move, while a mitigation block can help frame the return into that broader structure.
A practical way to combine them is:
• identify the displacement and the likely order block
• wait for price to retrace
• evaluate whether the return is acting as mitigation
• look for confirmation before entry
This approach helps reduce impulsive trades because you are not entering just because a box exists on the chart. You are waiting for price to revisit a meaningful area, then prove that the zone is still respected before acting.
How to trade mitigation block vs order block setups
The safest way to trade either concept is to treat the zone as context first and entry second. The marked area gives you a place to pay attention, but the trade still needs confirmation, invalidation, and realistic target planning.
A more repeatable approach is to map the zone in advance, wait for price to revisit it, then judge the reaction instead of assuming the zone must work. That process is slower than blind limit entries, but it usually produces cleaner execution and more honest journaling later.
Step 1: Mark the zone with a reason
Do not mark a box just because price reacted there once. If you are calling something an order block, make sure it is tied to displacement and a meaningful structural break. If you are calling something a mitigation block, make sure the logic is centered on the return into the zone after prior expansion.
This matters because naming the zone changes what you expect from it. A mislabeled zone leads to the wrong read, the wrong patience level, and often the wrong trade.
Step 2: Wait for the revisit
A zone only becomes tradable when price comes back and interacts with it. Until then, it is just a level on the chart.
The revisit is where the concept starts to matter in real time, because now you can observe whether price rejects, absorbs, stalls, or slices through the zone. That reaction is often more useful than the label itself.
Step 3: Look for confirmation
Confirmation can come from a rejection candle, a reclaim, a break of short-term structure, or a clean reaction followed by follow-through. The exact trigger may vary depending on your model, but the principle is the same: let the market prove that the zone is being respected.
Swing Traders should avoid assuming that every tagged block will work. A zone becomes useful only when price reacts in a way that supports the trade thesis.
Step 4: Define stop placement
The stop should sit where the setup is clearly invalidated, not where the trade merely becomes uncomfortable. That often means beyond the far side of the zone, beyond the sweep wick, or beyond the local structural point that must hold if the reaction is real.
Good stop placement keeps the trade tied to structure instead of emotion. If price can move through your “idea level” without invalidating anything meaningful, the stop is probably too tight or the zone is not as clean as it looked.
Step 5: Set targets based on structure
Targets can be based on prior highs or lows, opposing liquidity, the next major supply or demand area, or the next obvious structural objective. The goal is to connect the trade to what the chart is likely to reach, not to arbitrary reward multiples detached from context.
When these setups work well, they often travel from one meaningful area to another. That is why structure-based targets usually fit this style better than purely mechanical exits.
Common mistakes Swing Traders make
The most common mistake is using the terms as labels without understanding the logic behind them. Once traders start drawing too many boxes, every chart begins to look “smart,” but the actual quality of the setup usually drops.
Other common mistakes include:
• calling every reaction zone an order block
• calling every pullback a mitigation block
• ignoring displacement and structure breaks
• entering on touch without confirmation
• forcing trades in weak or messy context
Most of these problems come from trying to turn a contextual concept into a shortcut. The best results usually come when the zone is clear, the reaction is obvious, and the trade still has to earn its way through confirmation.
A simple mitigation block vs order block checklist
A checklist helps keep these concepts honest, especially because both can become overly subjective if you stare at a chart long enough. The goal is not to prove your label is right, but to decide whether the zone is actually useful.
Checklist:
• Is the zone tied to clear displacement
• Did price break meaningful structure
• Am I marking the origin of the move or the revisit into it
• Is the context clean enough to support the setup
• Is confirmation present at the zone
• Is invalidation clear and reasonable
If several answers are unclear, the best decision is usually to wait. A clean zone with clean context is worth more than a perfectly named zone in a messy chart.
Using this in an Altrady workflow
A structured workflow makes these concepts more practical because it separates chart analysis from execution. The goal is to identify the zone, set alerts where the reaction matters, and then wait for price to prove the setup instead of forcing an entry the moment the level is touched.
A practical process looks like this:
1. Build a watchlist of liquid markets you follow consistently.
2. Mark displacement zones and note whether the logic is order block or mitigation-focused.
3. Set alerts where price revisit matters most.
4. Wait for confirmation before entering.
5. Record the setup and result in a crypto journal with notes and screenshots.
This kind of process reduces overtrading and makes reviews more honest because you can later evaluate not only whether the trade worked, but also whether you labeled and used the zone correctly in the first place.
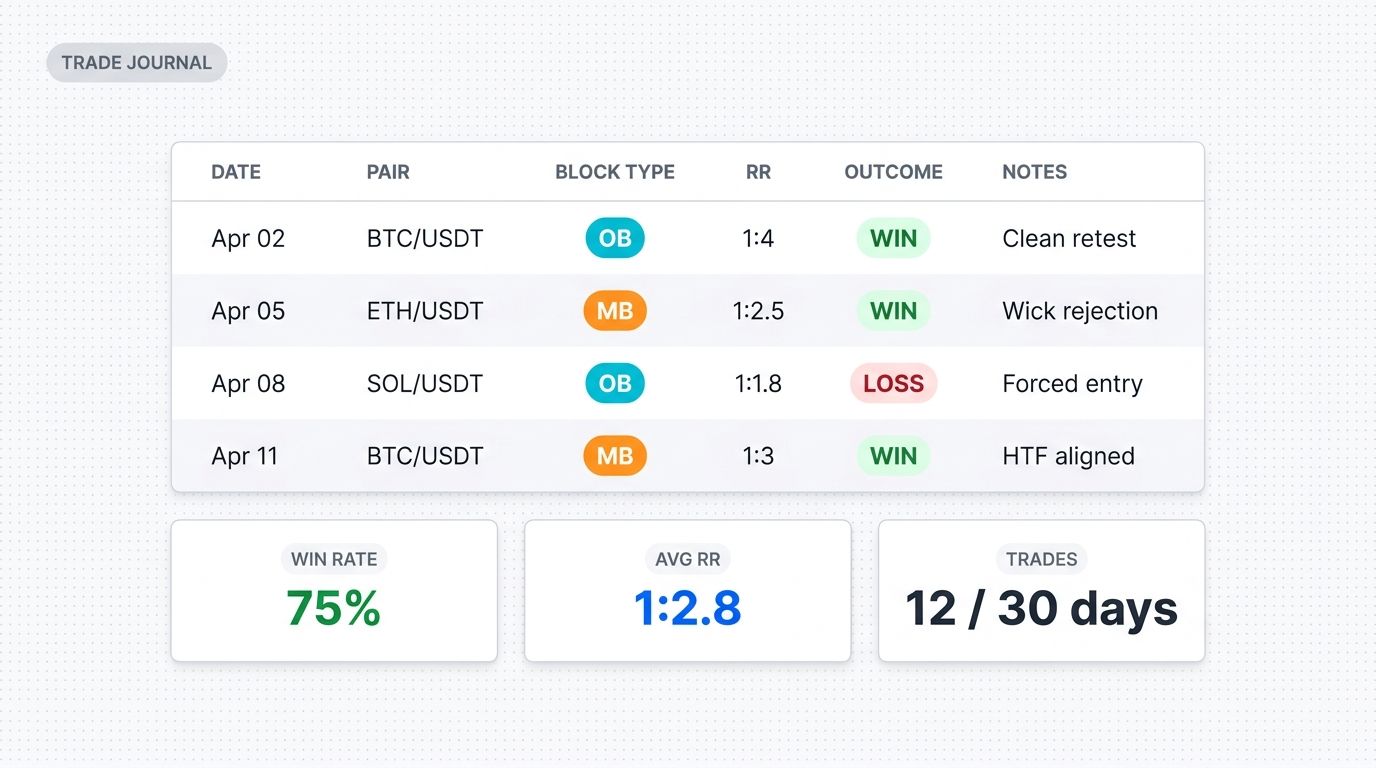
Reviewing these setups in a journal
A journal turns this from theory into process. Once you start recording which zones were tagged as order blocks, which ones acted more like mitigation, what the reaction looked like, and whether confirmation actually appeared, you begin to see whether your labeling is improving or whether you are still forcing ideas onto noisy charts.
That review matters because these concepts are easy to misuse when memory takes over. A consistent journal makes it much easier to compare the quality of the setup against the outcome, which is where real improvement usually comes from.
FAQ about Order Block vs Mitigation Block
What is the difference between a mitigation block and an order block?
An order block is usually tied to the last meaningful opposing candle before a strong displacement move, while a mitigation block is usually tied to price returning into a meaningful area to rebalance after that move. One is more origin-focused, and the other is more revisit-focused.
That is why they can overlap on a chart but still describe different parts of the story. The difference is less about the box itself and more about the function the zone is serving.
Is a mitigation block the same as an order block?
No. They are related concepts, but they are not the same thing.
An order block is generally linked to the origin of displacement, while a mitigation block is generally linked to the return into a prior area where price may rebalance before continuing or reversing.
Which is better to trade, a mitigation block or an order block?
Neither is automatically better in every situation. The better setup is the one with clearer structure, cleaner context, and stronger confirmation.
In many cases, traders use order blocks for context and mitigation behavior for timing. What matters most is not the label, but whether the reaction is real and the risk is clearly defined.
Risk disclaimer
Trading is risky. Losses can happen quickly in volatile markets, and neither mitigation blocks nor order blocks guarantee a reaction or a profitable trade. Swing Traders, use position sizing, predefined stops, and testing before allocating meaningful capital. Start a free trial on Altrady to mark key zones, set alerts for revisits, and track which block-based setups actually hold up in a structured workflow.