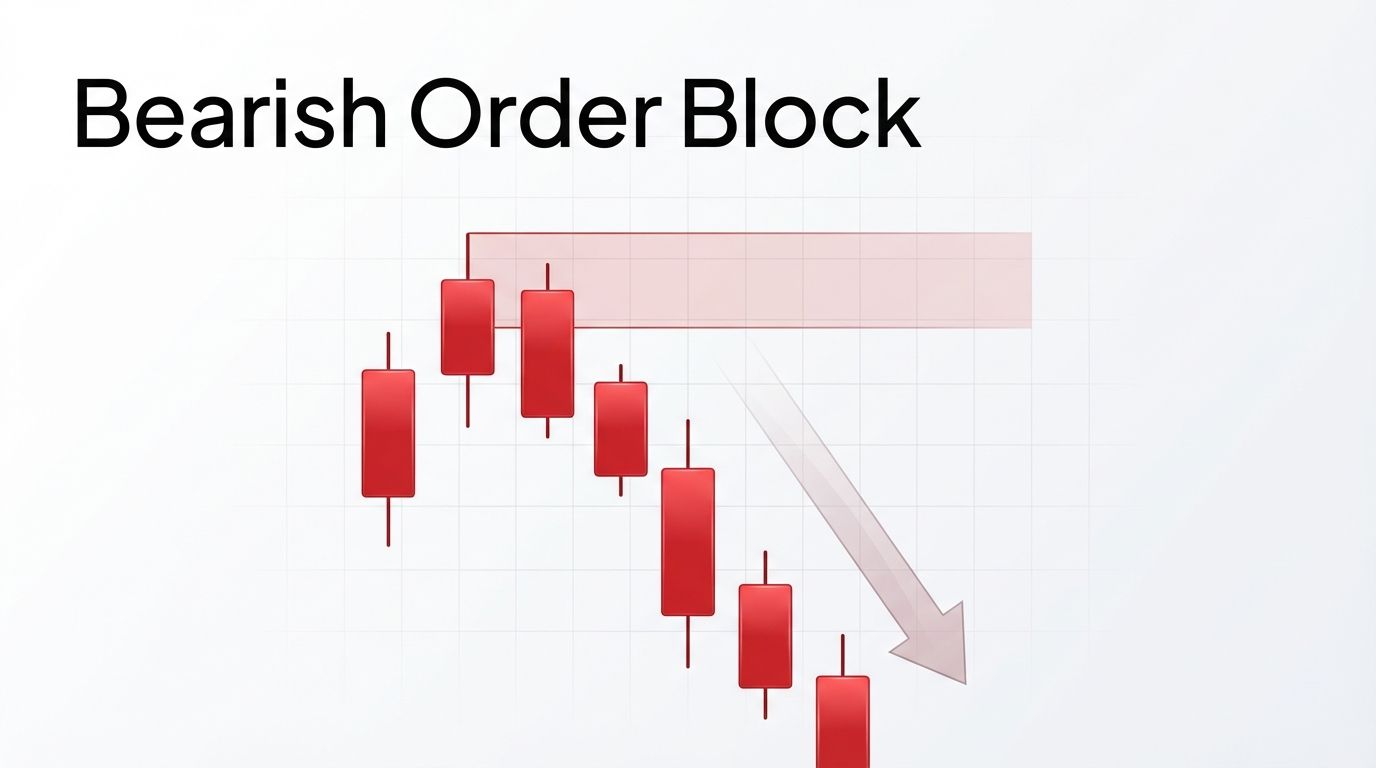
Swing Traders, a bearish order block is one of those concepts that can look simple on a chart but become confusing the moment traders start drawing boxes everywhere. The idea only becomes useful when it is tied to clear displacement, real structure, and a meaningful reaction, not when it is treated like a label for any bearish candle before a drop.
At its core, a bearish order block is about identifying the zone that sat just before aggressive selling took control and pushed price lower with intent. When that zone is marked correctly and price later returns to it, traders watch closely because it can become a meaningful area for rejection, continuation, or at least a cleaner read on where the market may defend supply.
What is a bearish order block
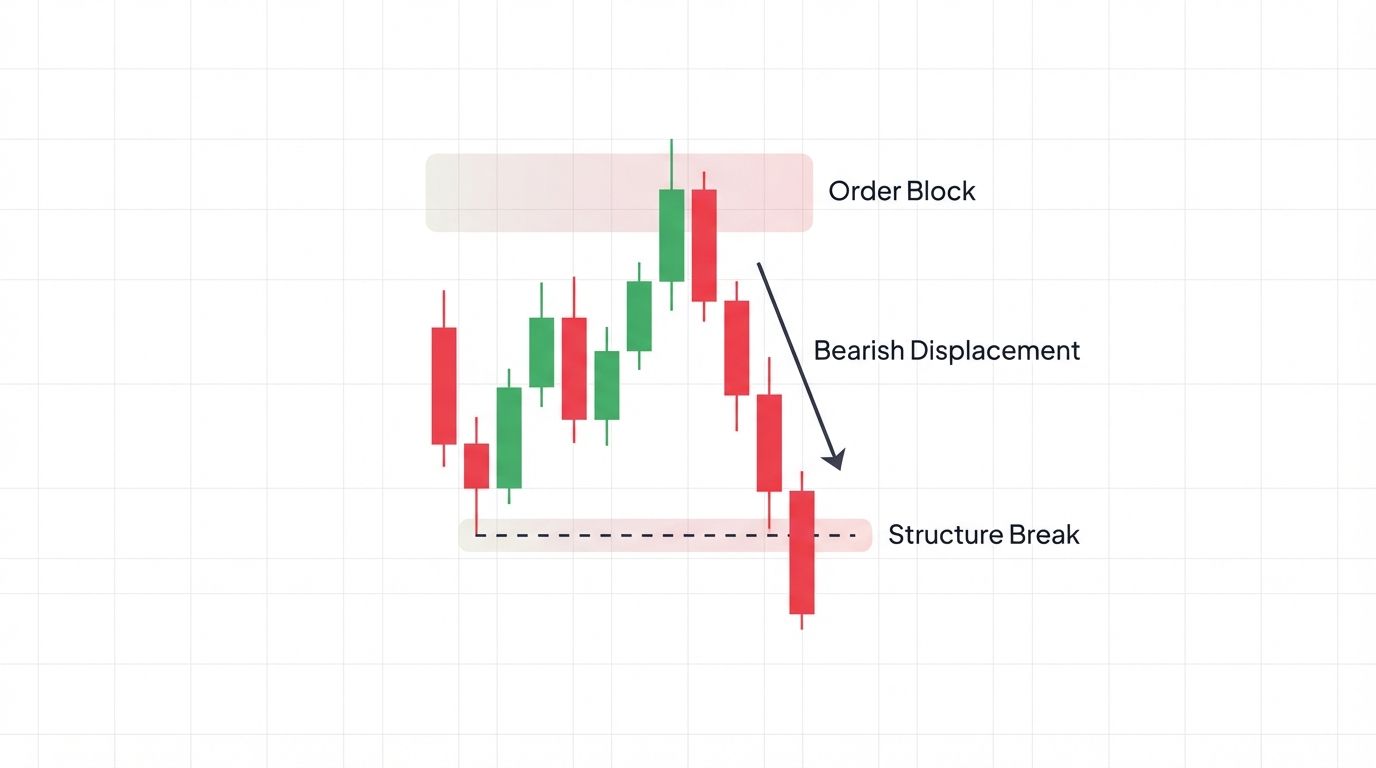
A bearish order block is typically the last bullish candle, or small bullish cluster, before a strong bearish displacement move that breaks structure and shows clear selling intent. Traders mark that area because they believe it represents a zone where significant selling activity entered the market before price moved lower with strength.
The important part is not the candle color alone. A bullish candle does not become a bearish order block just because price dropped afterward. The zone becomes meaningful only when the move away from it is strong enough to suggest that sellers took control decisively and pushed the market through an important level.
Why bearish order blocks matter
Bearish order blocks matter because they help traders frame where supply may still be sitting if price retraces back into a previously defended zone. Instead of chasing a move after it has already dropped, traders can use the zone to anticipate where a cleaner reaction may occur if the market revisits it.
This matters even more in fast-moving markets where entries taken in the middle of bearish expansion often come with poor risk-to-reward. A well-defined bearish order block can give Swing Traders a more structured place to watch for rejection, confirmation, and invalidation, which usually leads to better decisions than reacting in the middle of momentum.
How a bearish order block forms
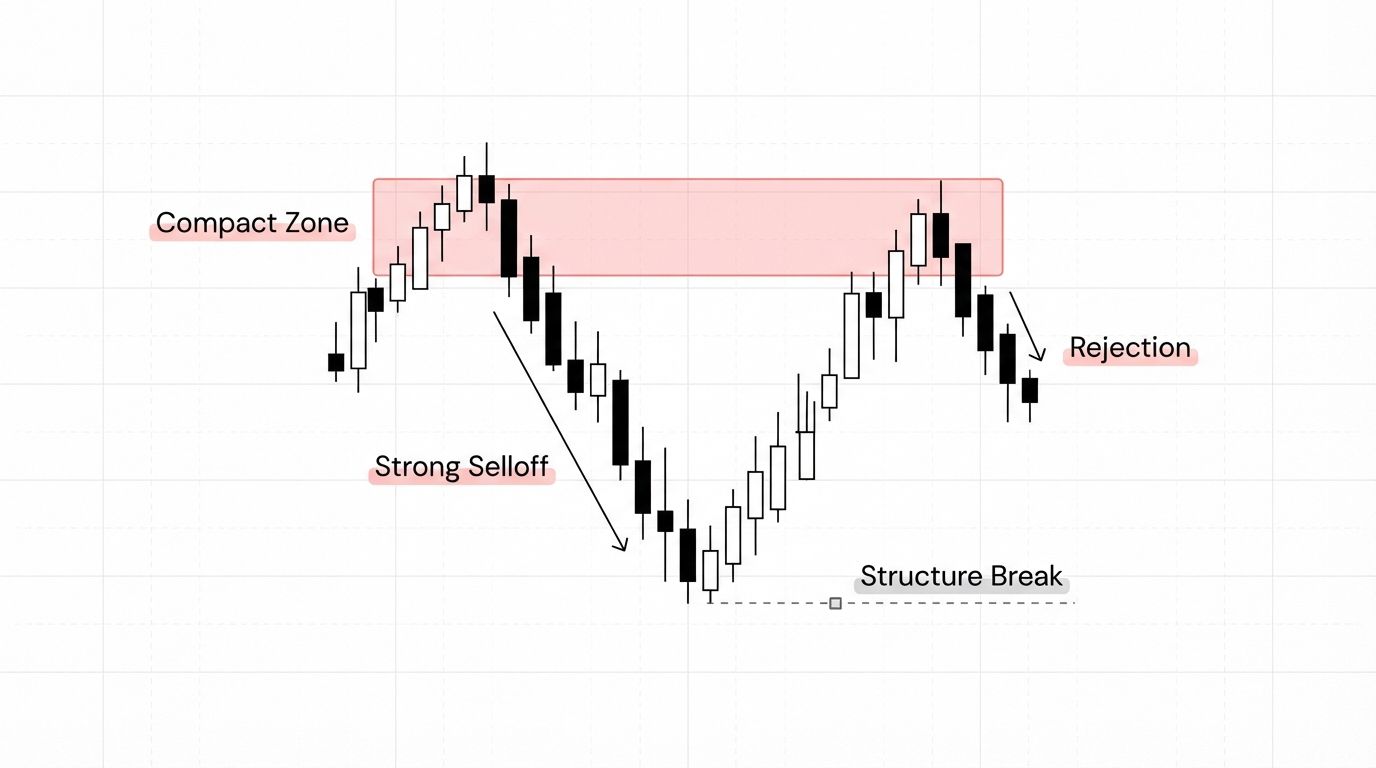
A bearish order block forms when price builds a local structure, then sells off aggressively and breaks through meaningful support or short-term structure. That displacement is what gives the zone its relevance, because it shows that price did not simply drift lower, it moved with force.
A cleaner bearish order block usually includes:
• a final bullish candle before the drop
• strong bearish displacement after the zone
• a break of nearby structure
• visible intent, not weak or grinding price action
Without those elements, the zone becomes much harder to trust. If price leaves slowly, fails to break anything important, or immediately stalls, the “order block” label becomes much less convincing.
What makes a bearish order block valid
Not every final bullish candle before a decline is a valid bearish order block. The setup becomes more useful when the structure around it is clean and the displacement away from the zone is obvious enough that another trader could identify it quickly without forcing the read.
Common characteristics of a stronger bearish order block include:
• clear bearish displacement away from the zone
• a meaningful break of market structure
• a compact and readable origin area
• a later revisit that produces a reaction, rejection, or stalling behavior
• enough surrounding context to show the move was not random noise
The cleaner the zone is, the easier it becomes to manage. If the block is wide, messy, or built out of several indecisive candles with no real structure break, it may still produce a reaction, but it usually becomes much harder to trade with confidence.
Bearish order block vs bearish breaker block
A bearish order block and a bearish breaker block are related ideas, but they are not the same thing. A bearish order block is usually tied to the origin of the bearish displacement, while a bearish breaker block is generally associated with a prior bullish area that fails and then flips into resistance after structure changes.
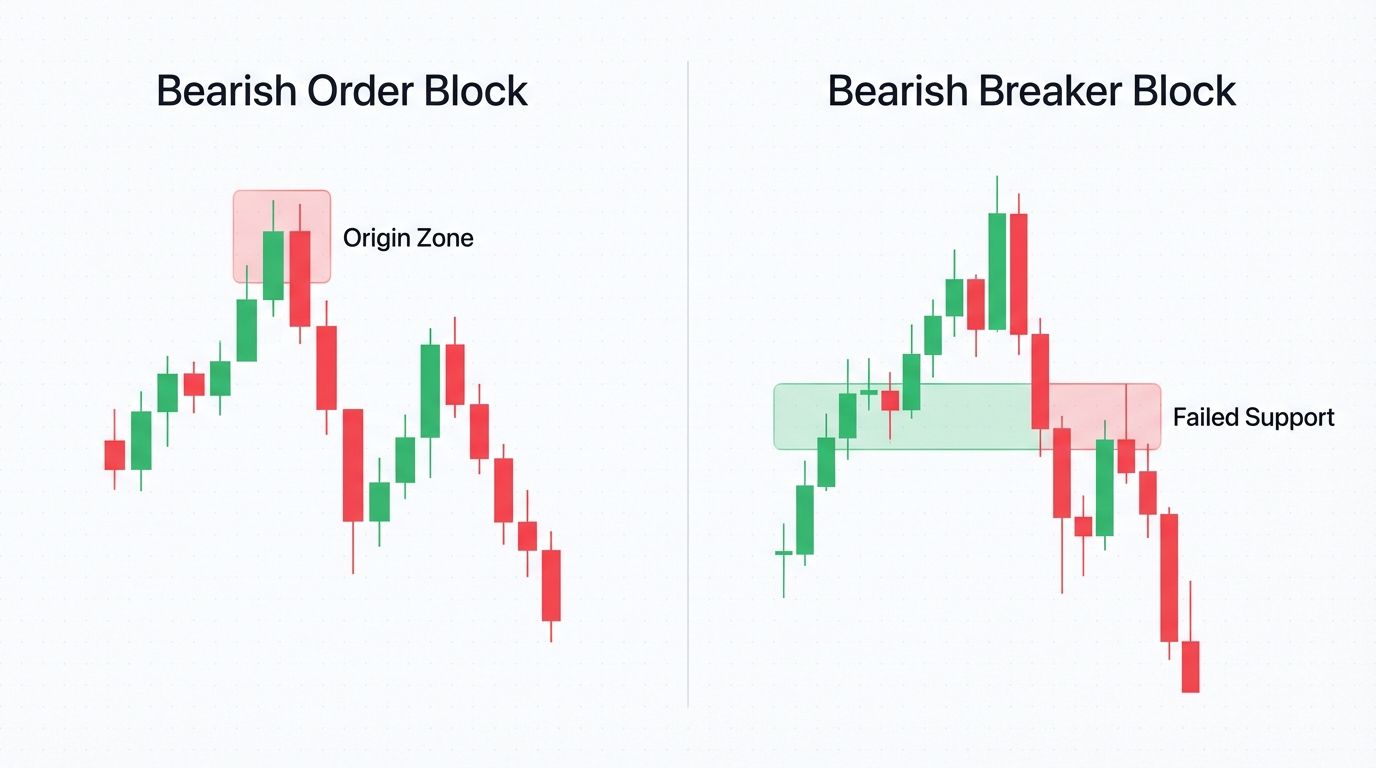
The difference matters because the logic behind the zone changes the expectation. With a bearish order block, the trader is usually focused on where sellers originally took control. With a bearish breaker block, the focus is more on a failed prior bullish zone that price later uses as resistance after the market structure has already shifted.
That is why labeling matters. A zone may look similar on a chart, but if the structural story is different, the trade logic should be different too.
How to identify a bearish order block on a chart
The most practical way to identify a bearish order block is to start with the bearish move, not the candle itself. First, find a strong downside displacement that clearly broke a meaningful level. Then work backward and identify the last bullish candle or small bullish cluster before that move began.
A simple process looks like this:
• find the bearish displacement
• confirm that structure was broken
• locate the final bullish candle before the move
• mark the body or relevant zone consistently
• wait for price to revisit the area before treating it as tradable
This process helps reduce random box-drawing because it forces the trader to anchor the zone to behavior, not just appearance. Swing Traders should focus on the cleanest, most obvious examples first, because weak examples usually lead to weak reactions and weaker trade quality.
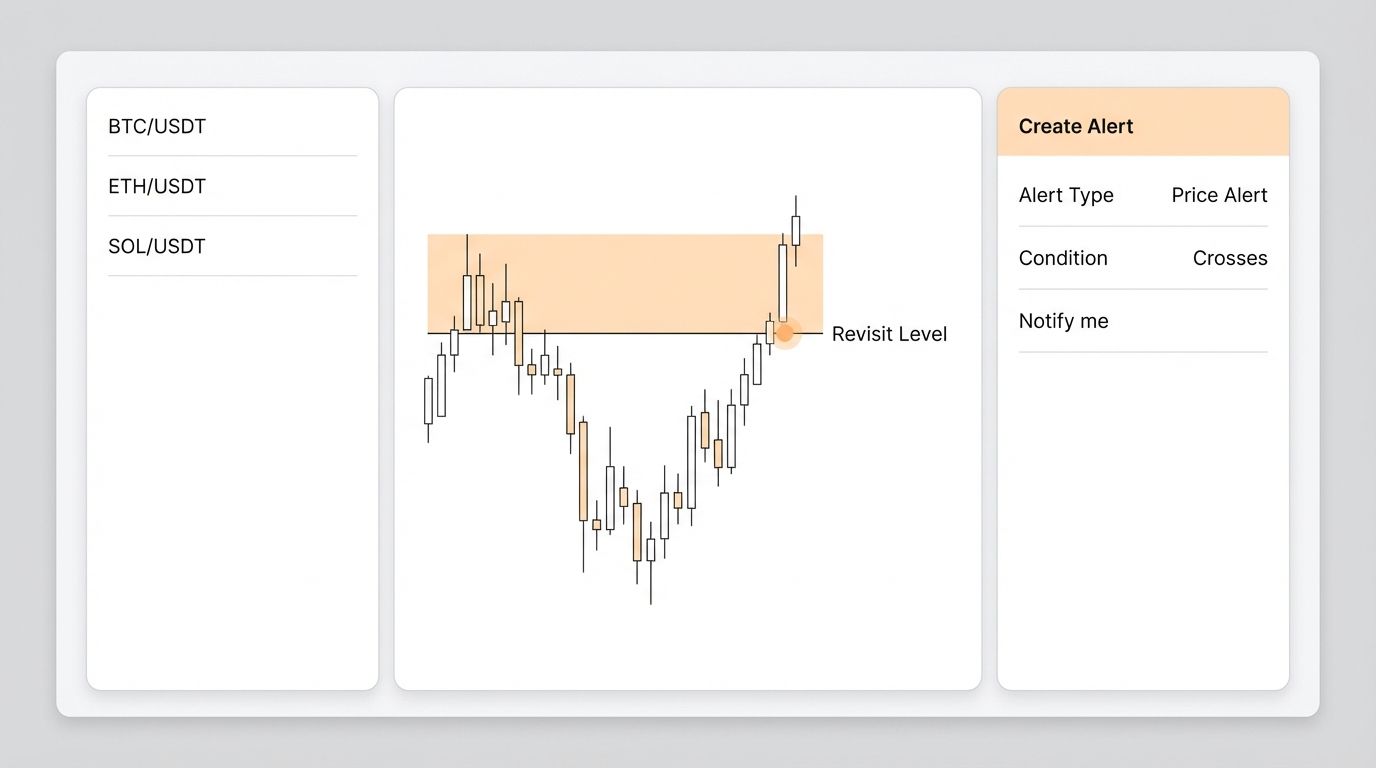
Why the revisit matters
A bearish order block usually becomes most useful when price comes back into it after the original drop. Until that revisit happens, the zone is simply an area of interest on the chart, not a trade in progress.
The revisit matters because it gives the market a chance to reveal whether sellers still care about that area. If price returns and rejects, stalls, or loses momentum inside the zone, the bearish case becomes more interesting. If price cuts through the block cleanly without a meaningful reaction, the zone may not be worth trading.
This is why the revisit should be treated as a test, not as proof. The zone gets your attention, but the reaction determines whether the setup becomes actionable.
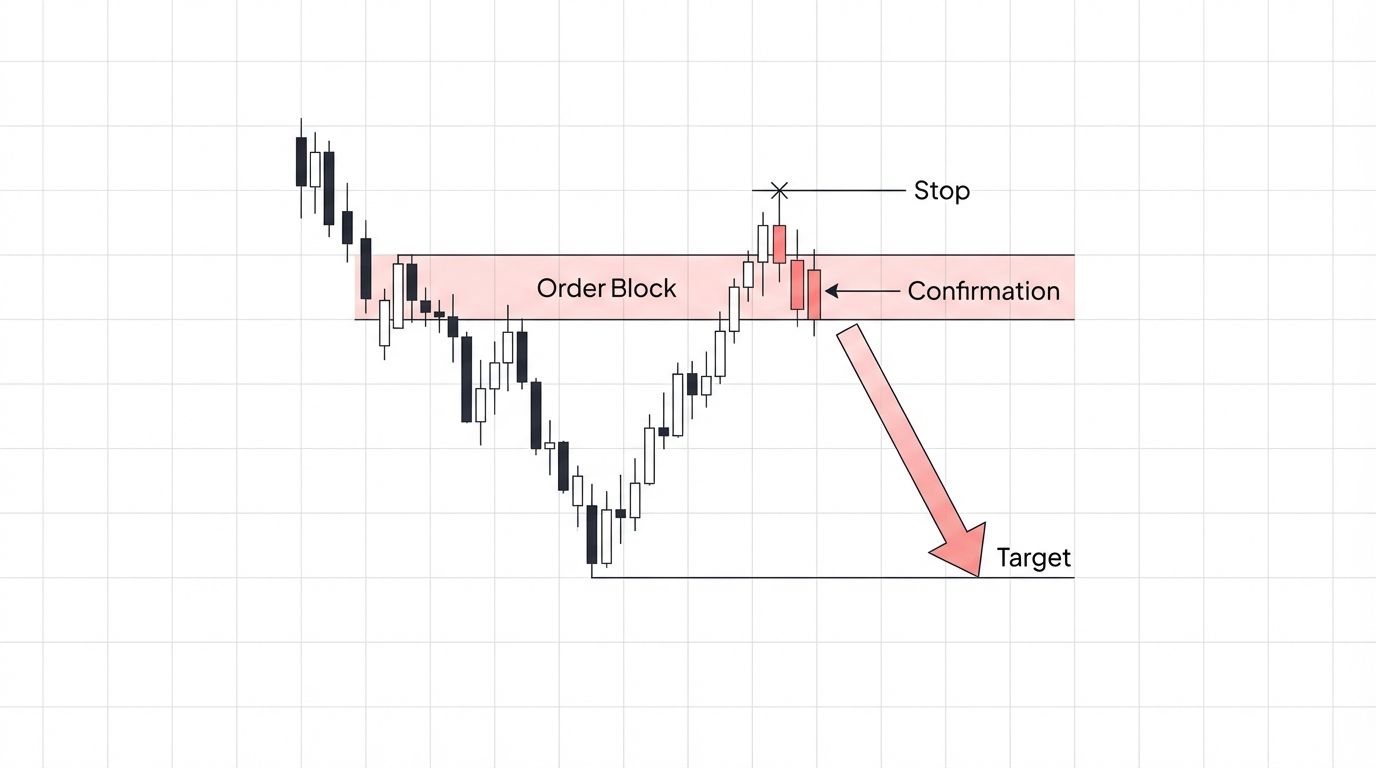
How to trade a bearish order block
The safest way to trade a bearish order block is to use it as a context zone first, then wait for the market to confirm that sellers are actually defending the area. Blind entries on touch can work sometimes, but they also create a lot of unnecessary losses when price simply trades through the zone before any real rejection appears.
A more repeatable approach is to identify the block early, let price revisit it, and then judge the reaction before committing capital. That process is slower, but it tends to produce cleaner entries, clearer invalidation, and much better journaling afterward.
Step 1: Mark the bearish order block with a reason
Do not mark the zone just because it is the last green candle before a drop. The bearish order block should be tied to clear displacement and a meaningful structure break, otherwise the zone is just a random area that happens to sit before lower prices.
That logic matters because your expectations come from the story behind the zone. If the zone did not launch a real bearish move, there is little reason to expect the market to care about it later.
Step 2: Wait for price to revisit the zone
The setup only becomes relevant in real time once price comes back into the order block. Until then, the zone is simply part of your map, not a reason to force a trade.
The revisit is where you can finally evaluate whether the market respects the area. This is where patience becomes a real edge, because many poor entries come from treating a marked zone as an automatic signal instead of a location that still needs to prove itself.
Step 3: Look for confirmation inside the zone
Confirmation can come in several forms, including a rejection candle, a loss of short-term bullish structure, a lower high after the revisit, or a failed push through the block. The exact trigger can vary depending on the model, but the principle stays the same: let the market show that sellers are defending the zone.
Swing Traders should avoid entering simply because price touched the box. The better trades usually come when the reaction is visible, not when the label looks convincing.
Step 4: Define stop placement logically
The stop should go where the bearish idea is clearly invalidated, which often means beyond the far side of the order block, beyond the sweep high, or beyond the structural point that should not hold if the zone is truly working as supply.
Good stop placement keeps the trade tied to structure instead of emotion. If price can trade comfortably above your zone without invalidating the bearish thesis, the stop is likely too tight or the block is not clean enough to justify the trade.
Step 5: Set targets using structure
Targets can be based on prior lows, opposing liquidity, the next major demand zone, or the next obvious structural objective beneath the entry. The best target is usually the one the chart is already pointing toward, not the one that simply creates a pretty risk-to-reward ratio on paper.
When bearish order block trades work well, they often move from one meaningful area into another. That is why structure-based targets usually fit this style better than arbitrary fixed-distance exits.
Common mistakes Swing Traders make
The biggest mistake is turning the concept into a shortcut instead of a framework. Once traders start calling every last bullish candle an order block, the chart becomes full of zones but very few of them actually deserve attention.
Other common mistakes include:
• ignoring displacement and structure breaks
• entering on touch without confirmation
• marking blocks that are too wide or too messy
• treating every revisit as tradable
• placing stops inside obvious noise
Most of these mistakes come from forcing the idea instead of letting the chart earn the label. The cleaner the zone and the cleaner the reaction, the more useful the bearish order block becomes.
A simple bearish order block checklist
A checklist helps keep the concept objective, especially because block-based trading can become overly subjective when you stare at a chart long enough. The goal is not to prove a box is valid. The goal is to decide whether the zone is actually worth risking capital on.
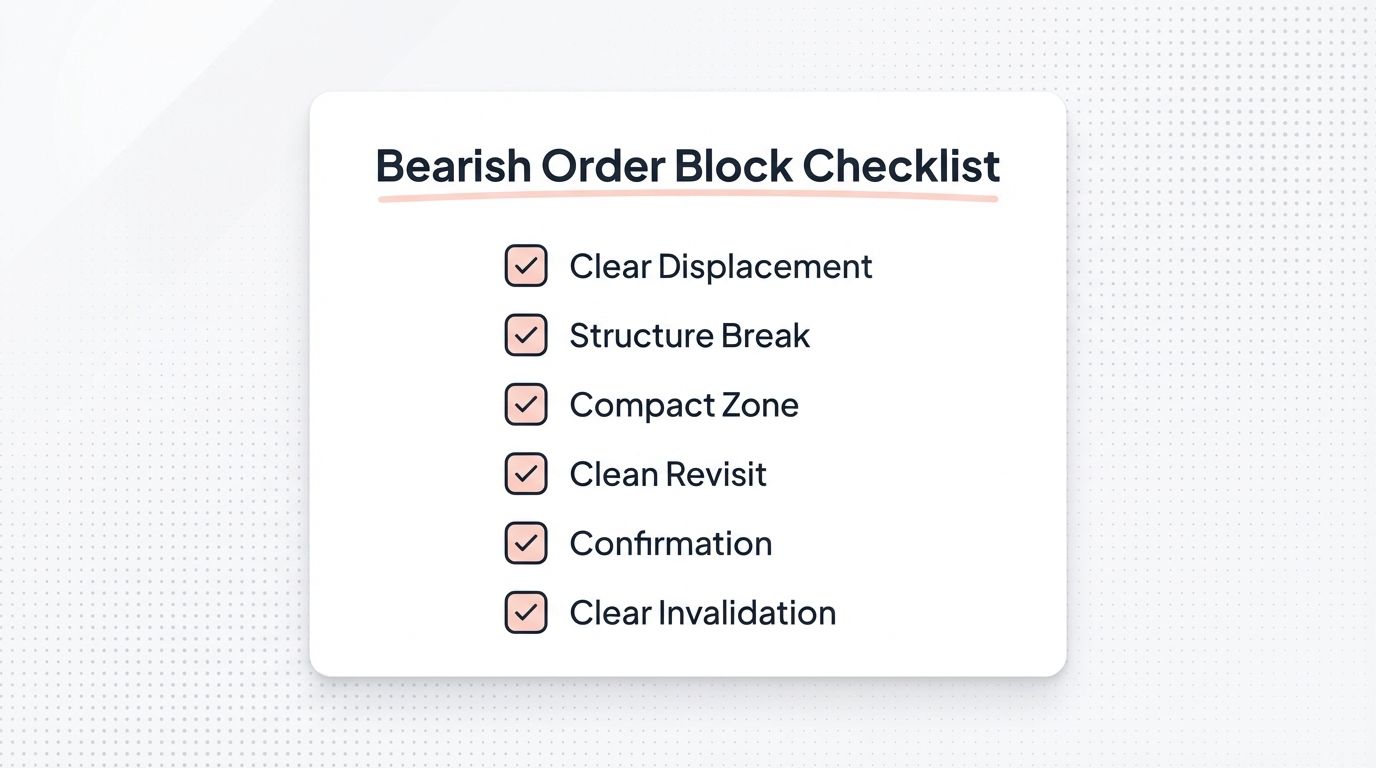
Checklist:
• Is the zone tied to clear displacement
• Did price break meaningful structure
• Is the block compact and readable
• Has price revisited the zone
• Is confirmation present inside the area
• Is invalidation clear and reasonable
If several answers are unclear, the setup is usually not ready or not worth taking. A clean bearish order block in clean context is far more useful than a perfectly labeled block in a messy chart.
Using a bearish order block in an Altrady workflow
A structured workflow makes bearish order block trading much easier to execute consistently because it separates the mapping process from the execution decision. The goal is to identify the zone, set alerts where the revisit matters, and then wait for price to confirm the reaction instead of forcing an entry in the moment.
A practical process looks like this:
1. Build a watchlist of liquid markets you follow consistently.
2. Mark clean bearish displacement zones and identify the most relevant order block.
3. Set alerts where the revisit matters most.
4. Wait for rejection or confirmation before entering.
5. Record the trade and reaction in a crypto journal with notes and screenshots.
This approach usually improves discipline because it turns the setup into a repeatable process rather than an impulsive reaction to a colored box. It also makes later review far more useful, because you can see whether the zone was marked correctly and whether the reaction matched the original thesis.
Reviewing bearish order block setups in a journal
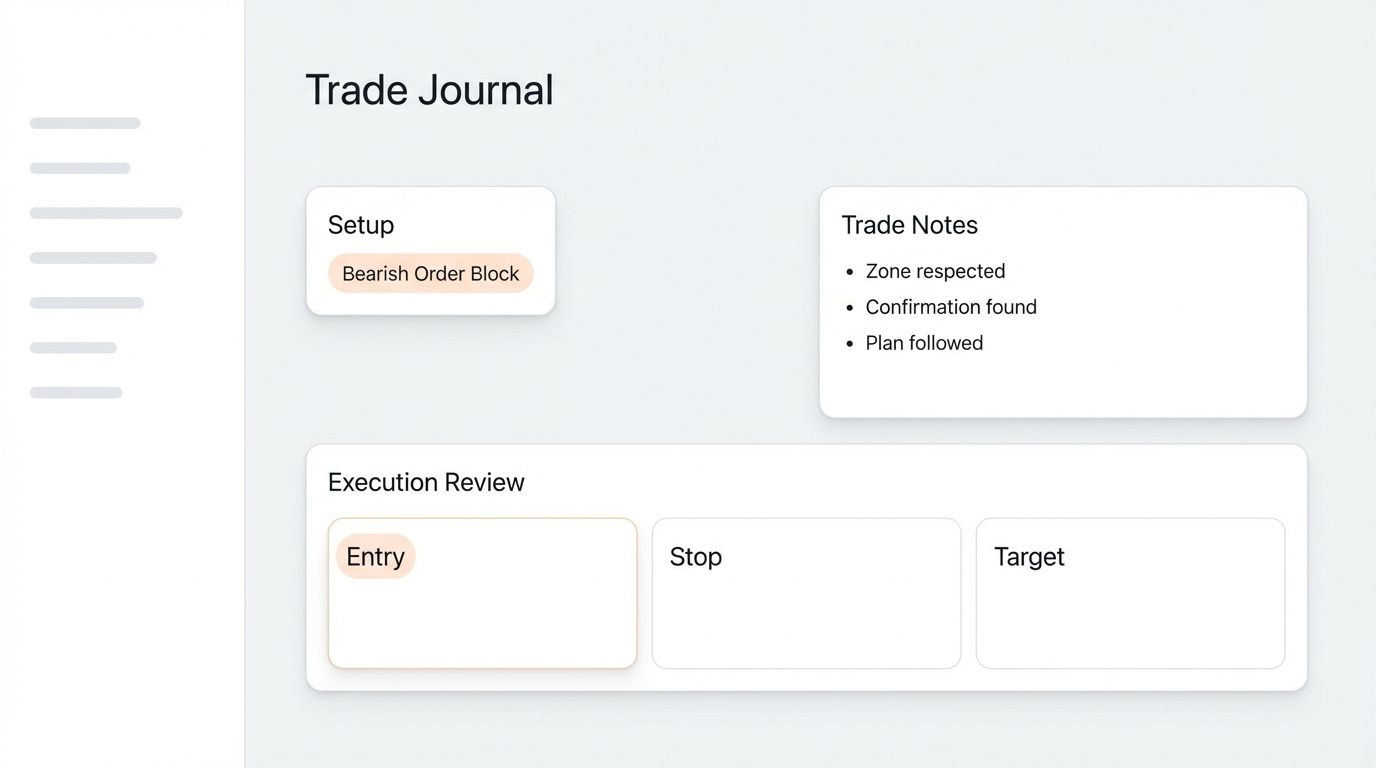
A journal is what turns bearish order blocks from theory into skill. Once you start recording which zones produced clean rejections, which ones failed, and whether your confirmation rules were actually followed, the difference between a high-quality block and a forced one becomes easier to see.
That review matters because memory tends to exaggerate the setups that worked and ignore the ones that never had strong structure to begin with. A consistent journal gives Swing Traders a much more honest view of whether their zone selection, patience, and execution are improving over time.
FAQ on Bearish Order Block
What is a bearish order block in trading?
A bearish order block in trading is usually the last bullish candle or small bullish cluster before a strong bearish displacement move that breaks structure and shows clear selling intent. Traders mark that zone because it may later act as a supply area if price revisits it and sellers defend it again.
The zone becomes meaningful because of what happened after it, not just because of the candle itself. Without displacement and structure break, the label is much less useful.
How do you identify a bearish order block?
The most practical way is to start with a strong bearish move, confirm that it broke meaningful structure, and then locate the final bullish candle before the move began. That area becomes the candidate zone.
From there, the real test comes when price revisits it. The better setups usually show a clean reaction, not just a touch.
Is a bearish order block always a sell signal?
No. A bearish order block is a context zone, not an automatic entry trigger.
It becomes more useful when price revisits the area and confirms rejection through structure, reaction, or follow-through. Without confirmation, it is simply a level worth watching.
Risk disclaimer
Trading is risky. Losses can happen quickly in volatile markets, and a bearish order block does not guarantee rejection or profit. Swing Traders, use position sizing, predefined stops, and testing before allocating meaningful capital. Start a free trial on Altrady to mark key supply zones, set alerts for revisits, and track bearish order block setups in a structured workflow.