
Swing Traders, some chart patterns matter because they reveal more than just a possible entry. They show how price moves from recovery into continuation, which makes them especially useful when the market is transitioning from hesitation back into strength. The cup and handle pattern is one of the clearest examples of that shift, because it shows buyers gradually regaining control, pausing briefly, and then attempting a breakout from a well-defined resistance area.
At first glance, the pattern looks simple: a rounded base, a small pullback, and then a push higher. In practice, though, the value of the setup comes from understanding what each phase means, how to judge whether the structure is actually valid, and when the breakout is strong enough to be tradable rather than just another false move.
What is a cup and handle pattern
A cup and handle pattern is a bullish chart structure that develops in two connected stages: first, price forms a rounded “cup” as the market recovers or re-accumulates, and then it creates a smaller pullback known as the “handle” before testing resistance again. When the structure is clean and the breakout is confirmed, the pattern often suggests that buyers are still in control and that price may continue moving higher.
What makes this pattern useful is that each part tells a different story. The cup reflects stabilization and recovery after weakness or consolidation, while the handle acts as a final pause, shakeout, or reset before the market attempts to break through resistance with renewed momentum. That is why the shape alone is never enough; the quality of the structure and the behavior around the breakout matter just as much as the pattern name.
How a cup and handle pattern forms
A cup and handle pattern develops in stages, and those stages are what make the structure readable. If you understand how the pattern builds from left to right, it becomes much easier to avoid entering too early or mistaking a weak recovery for a valid setup.
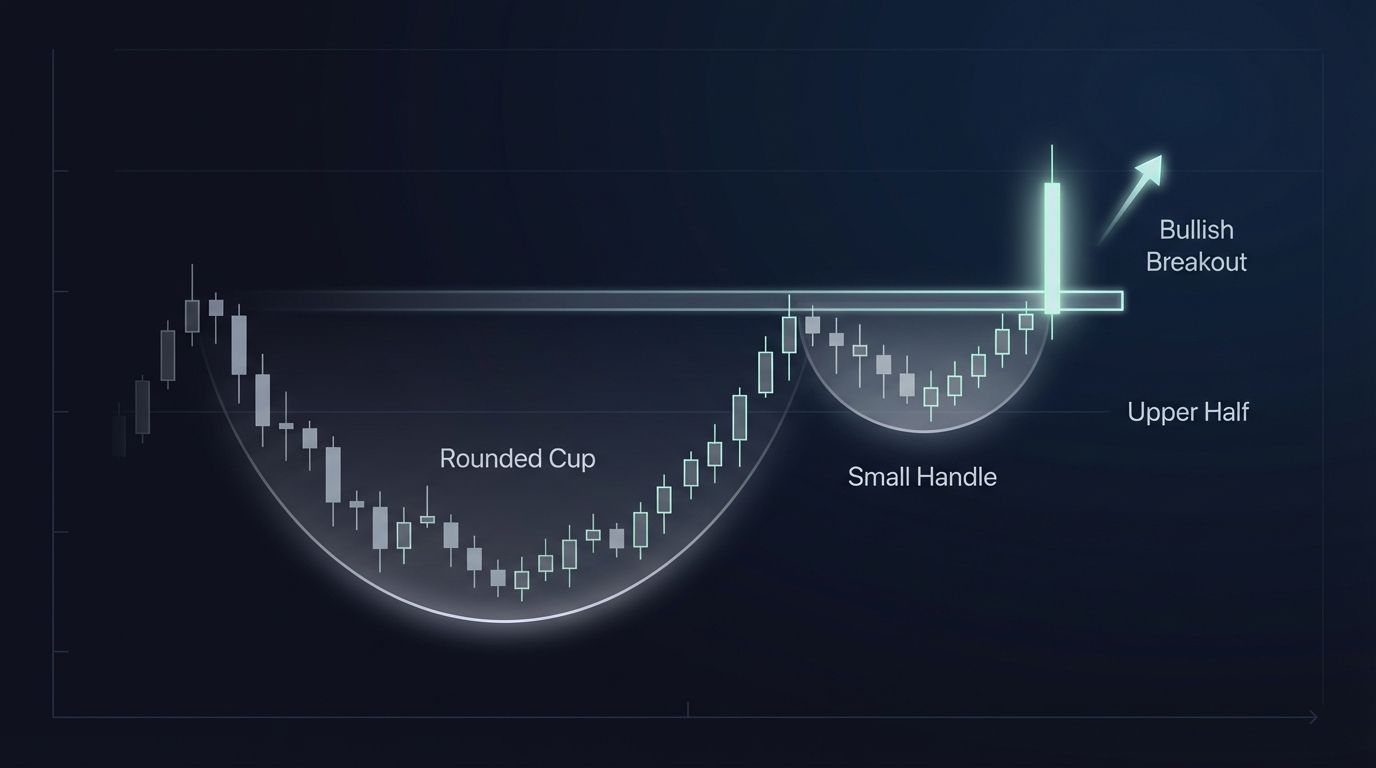
It usually begins with price declining or pulling back, then gradually stabilizing and climbing back toward a prior resistance area, which forms the rounded cup. Once price reaches that rim area, it does not always break out immediately. Instead, it often pauses and pulls back modestly, creating the handle, and only after that smaller consolidation does the market attempt a fresh move above resistance.

The reason this sequence matters is that it shows a progression from recovery to hesitation to renewed momentum. A proper cup and handle is not just a shape on a chart; it is a narrative of buyers slowly reclaiming control, testing resistance, absorbing selling pressure, and then trying to continue the move.
Key characteristics of a valid cup and handle pattern
Not every rounded chart shape deserves to be called a cup and handle, because the pattern depends on proportion and structure as much as it depends on appearance. A valid setup should look balanced enough that another trader could identify it quickly without having to stretch the definition.
Common characteristics include:
• a rounded cup, not a sharp V-shaped reversal
• a handle that is smaller than the cup
• a handle that forms in the upper half of the cup
• a breakout above the cup rim or handle resistance
• a clear prior resistance zone at the rim
The cleaner these proportions are, the easier the trade becomes to manage, because the breakout level, invalidation point, and general structure all become easier to define. Messy shapes, overextended recoveries, and deep handles tend to reduce reliability because they introduce more ambiguity into what should be a relatively straightforward continuation or recovery setup.
Swing Traders should focus on patterns that look obvious, balanced, and easy to explain. If the pattern only makes sense after a lot of rationalizing, it is usually better to skip it and wait for a cleaner structure.
Cup and handle vs rounded bottom
A cup and handle and a rounded bottom can look similar at first because both involve a curved recovery, but they are not the same pattern. The difference is that a rounded bottom ends with the cup itself, while a true cup and handle adds one more controlled pullback before the breakout attempt.
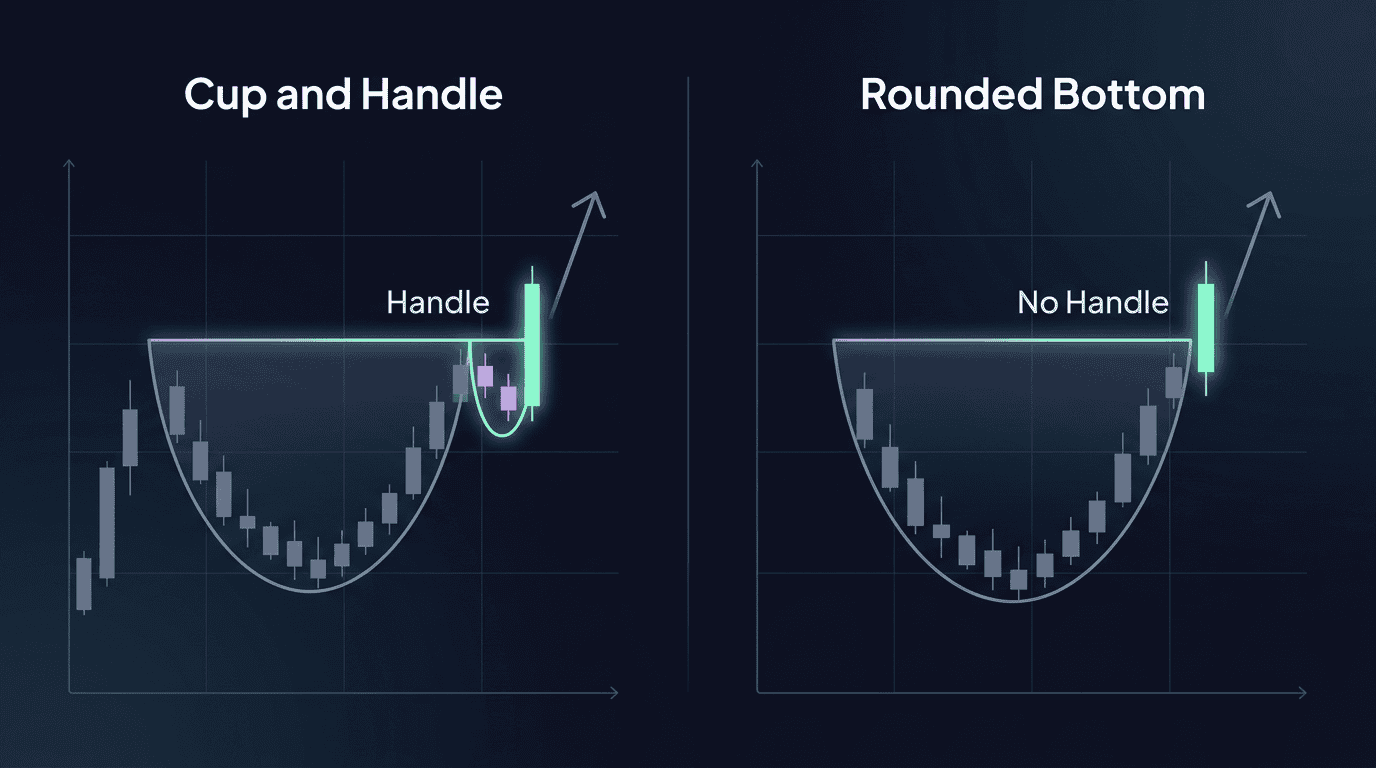
That extra handle matters because it acts as a final test of strength. Instead of price running straight into resistance and breaking immediately, the handle gives the market a chance to pause, shake out weaker buyers, and then attempt the breakout from a more structured base. Without that handle, the setup may still be bullish, but it is not technically a full cup and handle pattern.
Swing Traders should avoid calling every rounded recovery a cup and handle simply because the left side and right side of the chart look similar. The handle is what adds the final layer of confirmation and makes the breakout setup more defined.
How to identify the cup
The cup should look smooth and rounded, not rushed, because that rounded shape suggests gradual accumulation rather than an impulsive bounce. A strong cup typically shows price declining into a low, spending some time stabilizing, and then recovering in a steady way back toward the prior resistance area.
A cleaner cup usually includes:
• a gradual decline into the base
• stabilization near the bottom
• a steady climb back toward the rim
Sharp V-shaped recoveries can still lead to breakouts, but they tend to behave differently because they reflect sudden momentum rather than slow rebuilding of strength. The more rounded and balanced the base looks, the more convincing the pattern tends to be from a structural point of view.
For Swing Traders, the cup should be treated as the preparation phase, not the trigger. It tells you the market is rebuilding strength, but the tradable decision usually comes later, once the handle forms and the breakout level becomes clear.
How to identify the handle
The handle is the smaller pullback that forms after price returns to the cup rim area, and its job is not to destroy the pattern but to refine it. In most healthy setups, the handle drifts sideways or slightly downward, giving price time to consolidate near resistance rather than collapsing back into the cup.
A strong handle usually has:
• lower volatility than the cup
• a shallower pullback relative to the cup depth
• support holding in the upper half of the cup
• a shorter duration than the cup
If the handle becomes too deep, too wide, or too messy, the setup loses quality because it suggests that buyers are not holding higher prices as well as they should. That does not always invalidate the pattern immediately, but it does weaken the bullish case and makes the breakout less attractive from a risk-to-reward perspective.
Swing Traders should think of the handle as the final pause before a potential breakout, not as a second major correction. If it starts to behave like a fresh downtrend instead of a controlled pullback, the pattern is no longer doing what it is supposed to do.
How to trade a cup and handle pattern
The safest way to trade a cup and handle is to let the market confirm the setup before committing capital. Many failed trades happen because traders fall in love with the shape and enter too early, long before the breakout proves that buyers are actually ready to push higher.
A better approach is to treat the pattern as a sequence: identify the structure, wait for the handle to finish forming, define the breakout level, and then act only when price confirms strength. That process is slower, but it is also far more repeatable.

Step 1: Mark the cup rim resistance
The cup rim is the resistance area where price previously turned lower, and it becomes the most important level in the entire pattern. In many cases, both sides of the rim form near the same price zone, which makes that area the natural breakout line to watch.
Marking this level early matters because it gives you a clear reference point before price returns to it. Once the market approaches resistance, you already know what level must break for the setup to shift from “interesting” to “actionable.”
Swing Traders should define that rim as a zone, not an exact single tick, because resistance often behaves as an area rather than a perfectly precise line. The clearer the rim is, the easier it becomes to set alerts and manage the eventual breakout.
Step 2: Wait for the handle to form
Once price reaches the rim, it is tempting to expect an immediate breakout, but a proper cup and handle often needs one more pause first. That pause is the handle, and it helps reset momentum while creating a more structured place to define risk.
The best handles stay relatively shallow, controlled, and short-lived compared with the cup. They should look like a pause near resistance, not like the start of a new bearish move.
This step is where patience becomes a real edge. By waiting for the handle rather than forcing an early entry near the rim, Swing Traders give the pattern time to become cleaner and the breakout level time to become more meaningful.
Step 3: Wait for breakout confirmation
The pattern becomes tradable when price closes above the handle resistance or the cup rim with enough strength to suggest acceptance above that level. A wick above resistance is not enough by itself, because markets often probe above a level before falling back inside the range.
What you want to see is evidence that buyers are not just testing the level, but actually holding it. That can come in the form of a strong candle close, follow-through after the breakout, or a clean move that does not immediately collapse back under resistance.
Waiting for confirmation often means giving up the earliest possible entry, but that trade-off is usually worth it. Swing Traders should aim for clearer execution, not just faster execution.
Step 4: Define stop placement
Stop placement should reflect where the pattern is truly invalidated, not where the trade merely starts to feel uncomfortable. In most cup and handle setups, the stop is placed below the handle low, below a recent swing low inside the handle, or below a breakout retest if the entry comes after the retest.
The logic is simple: if price loses the handle structure decisively, the breakout thesis becomes weaker, and the trade no longer has the same bullish structure it had at entry. That makes the stop part of the setup, not a random safety distance.
Swing Traders should always size the position based on that stop distance rather than on the profit they hope to make. Good setups still fail, and the position size should already assume that possibility.
Step 5: Set realistic targets
Targets can be estimated using measured moves, nearby resistance, or the next obvious liquidity area above the breakout. The most common approach is to project the depth of the cup upward from the breakout zone, which gives a structured objective rather than a random guess.
Other useful target references include:
• prior resistance zones
• round numbers
• the next major liquidity pool
A measured move should be treated as a guide, not a promise. In some cases, price will exceed it; in other cases, it will stall before reaching it, which is why many Swing Traders combine a defined target with a trailing method once the breakout has already moved in their favor.
Risk management for cup and handle trades
Even a clean-looking cup and handle can fail, which is why risk management is not a separate topic from the pattern. The setup may look excellent, but if the size is too large, the stop is poorly placed, or the breakout is forced in the wrong context, the trade can still damage the account.
Key rules include:
• size the position based on stop distance
• avoid forcing entries before breakout confirmation
• skip deep, weak, or messy handles
• be careful if the breakout runs directly into nearby resistance
The purpose of these rules is not just to reduce losses. They also help keep the pattern objective, because they force you to treat the setup as a structured trade rather than a story you want to believe.
Swing Traders, quality and discipline matter more than frequency. One clean cup and handle with proper sizing is more valuable than several rushed breakouts that never had the right structure to begin with.
A simple cup and handle checklist
A checklist keeps the pattern objective, which is especially important for chart patterns that can become too subjective if you stare at them long enough. It helps reduce forced entries by making you confirm whether the structure actually meets your rules before you commit to the trade.
Checklist:
• Is the cup rounded and clear
• Is the handle smaller than the cup
• Is the handle in the upper half of the cup
• Is the breakout level clearly defined
• Is confirmation present on the breakout
• Is stop placement clear and reasonable
If multiple answers are no, it is usually better to skip the setup. A clean pattern is worth waiting for, while a weak pattern often costs more in frustration and false starts than it ever returns in profit.
A checklist also improves journaling later because it lets you review whether the trade followed your own criteria. Over time, that makes it easier to see which versions of the pattern actually perform best for your style.
Using a cup and handle workflow in Altrady
A structured workflow makes this pattern much easier to trade consistently because it removes the need to make every decision in the heat of the moment. The goal is to identify the setup early, define the important levels in advance, and then let alerts and rules handle the execution process.

A practical workflow looks like this:
1. Build a watchlist of liquid markets in uptrends or recovery phases.
2. Mark the cup rim resistance and the handle low.
3. Set alerts above resistance.
4. Wait for breakout confirmation before entering.
5. Record the trade in a crypto journal with notes and screenshots.
This process helps reduce emotional entries and late chasing, because the market comes to your level instead of forcing you to react impulsively. It also creates cleaner data for later review, which is what turns a pattern from a one-off trade idea into a repeatable setup you can actually improve over time.

Common mistakes Swing Traders make with cup and handle patterns
Most mistakes happen when traders rush the pattern or stretch the definition until almost any rounded move looks tradable. In practice, the handle and the breakout are what make the setup actionable, so ignoring those details usually leads to lower-quality trades.
Common mistakes include:
• calling a V-shaped bounce a cup
• entering before the handle forms
• trading deep, sloppy handles
• chasing the breakout after it is already extended
• placing stops too tight inside the handle
Avoiding bad patterns is a real edge, and in many cases it improves results faster than adding more indicators ever will. The biggest difference often comes not from finding more setups, but from becoming more selective about which ones are actually worth taking.
Swing Traders, if the structure looks forced, it probably is. Clear patterns are easier to trust, easier to manage, and much easier to review honestly after the trade is over.
FAQ about Cup and Handle Pattern
What is a cup and handle pattern?
A cup and handle pattern is a bullish chart pattern made of a rounded cup followed by a smaller pullback called the handle, and it often signals that price may continue higher after a confirmed breakout above resistance. The cup reflects recovery or accumulation, while the handle acts as a brief consolidation before the market attempts the next move.
The key idea is that the structure becomes meaningful only when price breaks out with confirmation. Until then, it is still a developing pattern, not a completed setup.
Is a cup and handle pattern bullish?
Yes, a cup and handle is generally considered bullish because it often forms before an upward continuation or breakout, especially when the handle stays shallow and the breakout occurs with clean structure. However, the bullish case becomes much stronger only after price confirms the move above resistance.
Without confirmation, the pattern is still only a possibility. Swing Traders should wait for the market to prove strength rather than assuming the shape alone guarantees continuation.
What timeframe works best for a cup and handle pattern?
A cup and handle can appear on many timeframes, but it is usually more meaningful on higher timeframes where the structure is clearer and the handle contains less noise. Larger timeframes also tend to make the rim resistance, handle depth, and breakout level easier to define.
Many Swing Traders mark the full pattern on a higher timeframe, then use a lower timeframe to refine entry and risk placement. What matters most is not the exact timeframe, but whether the structure is clear enough to apply the same rules consistently.
Risk disclaimer
Trading is risky. Losses can happen quickly in volatile markets, and chart patterns are not a guarantee of profit. Swing Traders, use position sizing, predefined stops, and testing before allocating meaningful capital. Start a free trial on Altrady to mark breakout levels, set alerts, and track cup and handle setups in a repeatable workflow.